Similar to a democratic country, where people have the right to make things better in the country. It can be by participating in elections by giving valuable votes to the right candidate who is offering some new changes which could be better for the people and Country.
Similarly, the Push Grants Program (PGP) is a democratic process in EPNS Ecosystem. It focuses on the support, suggestions, and contributions of EPNS Members that could help in the growth of the EPNS Ecosystem.
Push Grant Program is funded by the $PUSH Community treasury to prop up innovative ideas, suggestions, and great ideas which could help to expand the EPNS Ecosystem. People can contribute to EPNS in many creative ways like Youtube promotion opportunities, educational content, protocol analytics, research, etc. The PGP application is accepted by the grant proposal which is available on the governance forum gov.epns.io, which is required to fill. Once submitted according to forum criteria it will go for formal voting.

How To Get Started with PGP?
To get started with PGP, you will require to visit gov.epns.io and sign up on it.
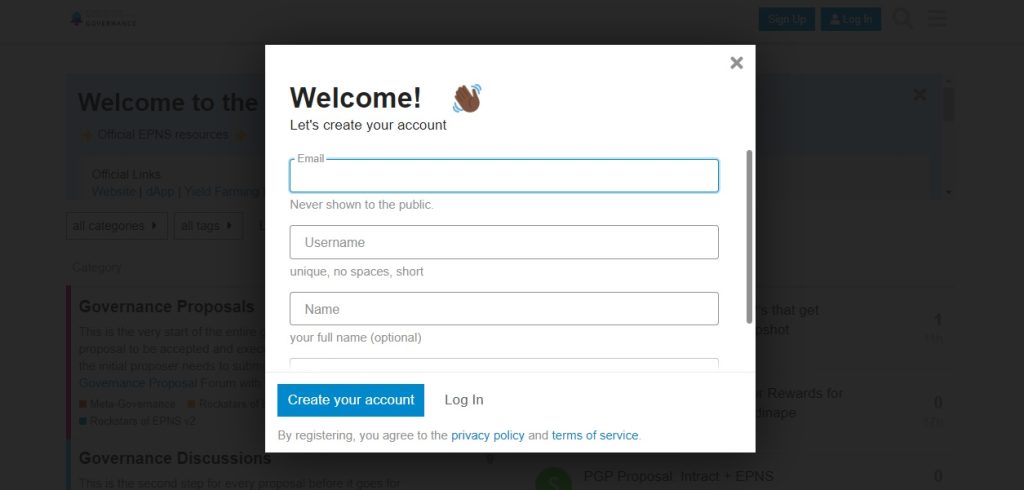
Then can create a grant proposal draft following the template.
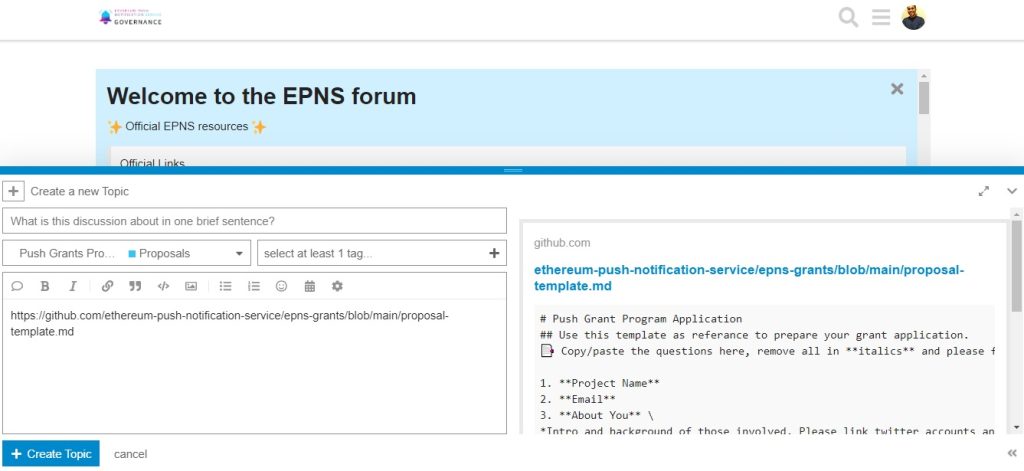
3. Submit the grant proposal to the governance forum
4. Await for feedback/queries from the community.
PGP Proposal Lifecycle
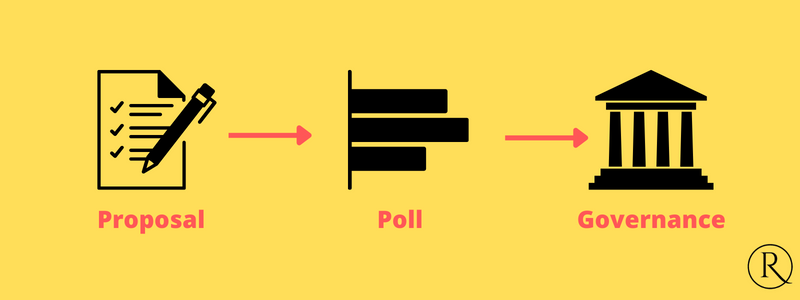
PGP Proposal Phase
This is the initial part of giving a proposal for PGP. One must follow the terms and conditions for successful proposal acceptance and execution. The proposer must follow the below rules while proposing suggestions or any kind of innovative ideas.
Promotion criteria:
Delegates $PUSH Holders will start poll voting if the grant proposal meets the following criteria:
- Must Follow the draft proposal template ( Link: https://github.com/ethereum-push-notification-service/epns-grants/blob/main/proposal-template.md )
- Must Submit under the push grant program(PGP) section.
- Must be live for at least 7 days.
- Must have minimum 10 likes.
- Must have minimum 3 comments in support.
Poll Phase
If the proposer full fills the above criteria successfully, then the next journey is polling. A push champion will create a poll for each grant proposal that meet the promotion criteria. The idea of this phase is to check the member’s opinions on the proposal on the basis of discussion and revision. Once it is done it is sent to formal voting.
Promotion Criteria:
- Must get at least 10 votes in total.
- The proposal will move along with for/against the majority.
- For: If more are in support, then it will move for the Snapshot for the governance phase.
- Against: The proposer is notified and asked to amend the feedback and reapply after digesting the feedback suggested.
Governance Phase – Snapshot
Once the proposal passes the polling phase, then it goes for formal voting, which takes place on Snapshot [https://snapshot.org/]. A formal proposal can be accepted or even rejected based on the below promotion criteria for this phase.
A minimum of 75,000 $PUSH tokens are required to create a proposal at this phase. One $PUSH = One Vote, votes on the snapshot are weighted by the number of $PUSH delegated to the address used to vote.
Promotion Criteria:
- The proposal is required to meet the Quorum for it to be considered valid.
- The proposal is considered defeated if the Quorum is not achieved during the voting period.
What is Quorum?
The purpose of the quorum is to check that the proposal which is approved has a good number of participations. For a vote to pass on the snapshot, it must achieve 1% of the circulating supply of $PUSH voting in support. If a proposal has the majority of votes in support but did not receive the necessary quorum then, the proposal will not approve it will get rejected.
How Developers can get started with EPNS?
EPNS is a decentralized open source protocol and currently, it has more than 18+ Channels on it, by major projects in Web3 including ENS, MakerDAO, Coindesk, and dYdX. Any protocol, service, or even individual who wants to integrate this notification service. They can easily opt for EPNS. Below are the steps on how to get started with it.
EPNS Integration: How to use ETHEREUM PUSH NOTIFICATION SERVICE?
The initial step for EPNS integration is the creation of a Channel, so below is the step-by-step explanation:
- To Connect Your wallet to EPNS ( https://app.epns.io ) via Ethereum Mainet Network. [Supported Wallet: Metamask, Wallet Connect, Ledger, Portis]
- A wallet address is eligible to create only one Channel on the protocol.
- A Channel is any service like protocol, dApp, or even web2 service that wants to send notifications out to web3 Wallet addresses to which you connected.
- A channel is free to assign sending notifications functionality to any other wallet addresses on their behalf.
- For Creating a channel You will require 50 DAI and Channel info such as Channel Name, Image, description, CTA, and some ETH too.
- Channels can send notifications to their users(wallet addresses) in many ways including: Gaseless ( Manually from EPNS dApp, Smart contract to Smart contract, Backend SDK ), Requires Gas (Showrunners Framework).
- Users can enjoy gaseless option to receive notifications from these Channels. Opted In will make you subscribers of that Channel and you will receive notification from that channel in your inboxes.
- If the User receives Non-Opted notifications that will be shown in Spam Folder.
By following the above process once the channel is created, then the channel owner is set to send notifications from the dApp and is ready to receive notifications on all the EPNS platforms- dApps, Browser Extension, Android App, and iOS App.
For the integration of EPNS here we have explained it in a simple way ( Code Resource: https://medium.com/ethereum-push-notification-service/how-to-get-started-with-epns-for-devs-8fd281e94705)
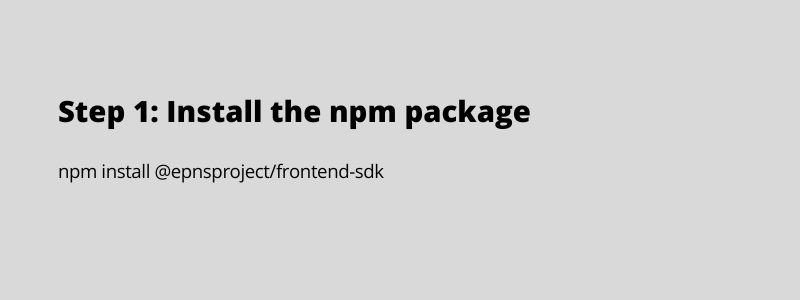
Integration with the Backend SDK
For backend integration, SDK is used. It allows the developer & protocol to access the functionality of the EPNS Protocol. It is done from the backend by implementing the computational coding logic for notifications. The SDK also holds tools for debugging and testing for dummy objects.
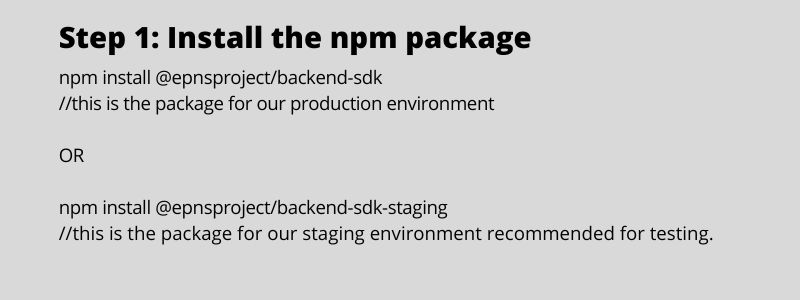
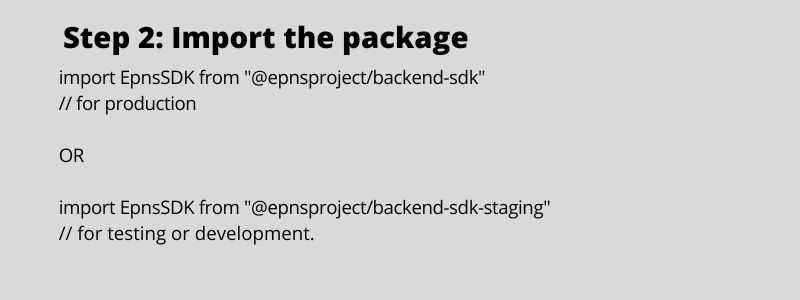
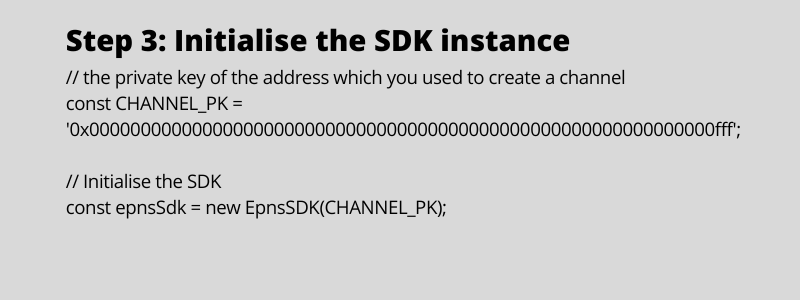
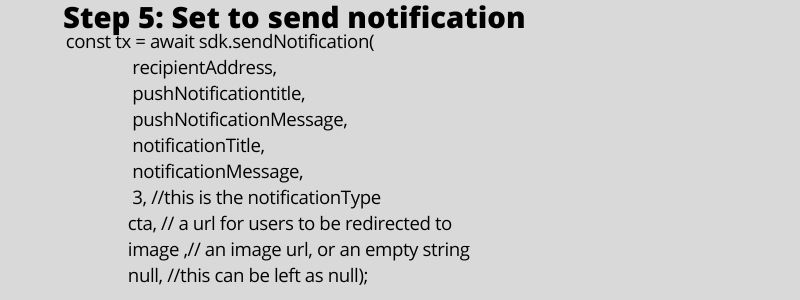
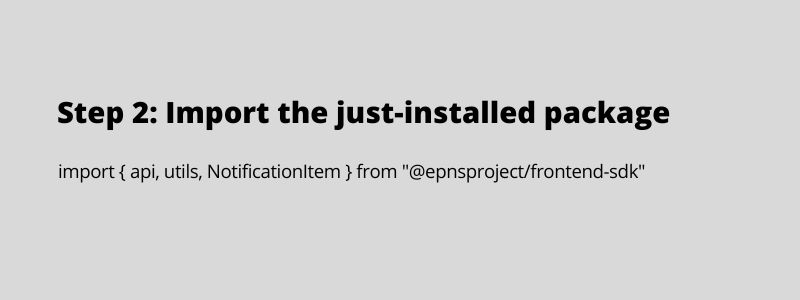
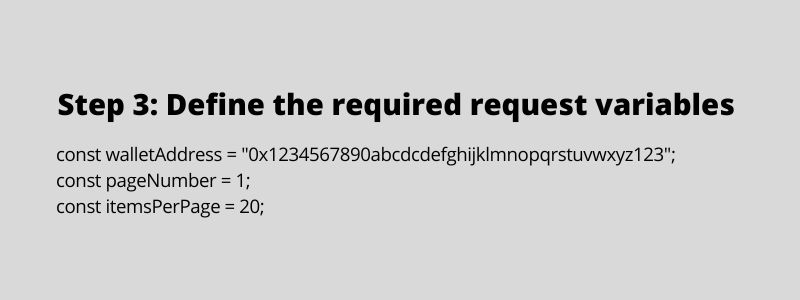
Below are the coding steps for SDK integration to the back-end server:
Step 4: Now You have to implement the logic for whether it is off-chain or on-chain for which the notification will get sent.
The recipient who is the owner of the address as mentioned will be now able to receive notifications, which he/she can get in the staging (https://staging.epns.io/) or production environment (https://app.epns.io/) or else he/she could get EPNS chrome extension or mobile app for receiving the notifications.
Here are some documentation and SDK repo for help:
- https://github.com/ethereum-push-notification-service/backend-sdk-starter-code
- https://github.com/ethereum-push-notification-service/epns-backend-sdk-staging
Integrating with the Front-End SDK
Front-End SDK helps to integrate the notification service to dApps or Mobile Applications for Developers and Protocols.
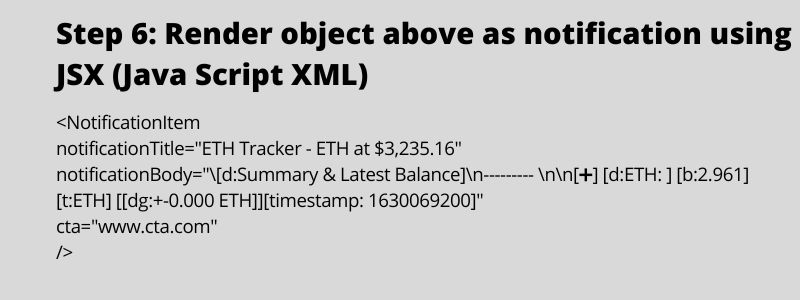
Below is the example of How one can integrate React Front-End dApp with EPNS:
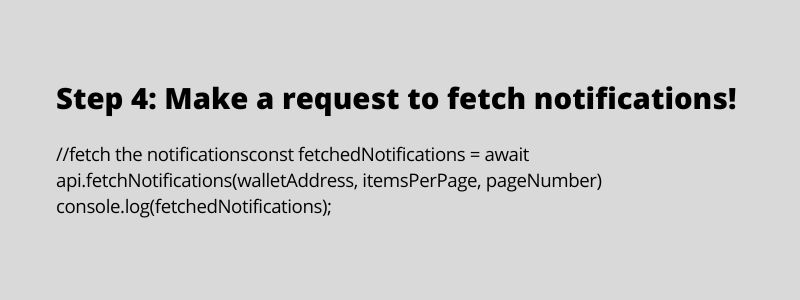
The next process is about fetching the notification
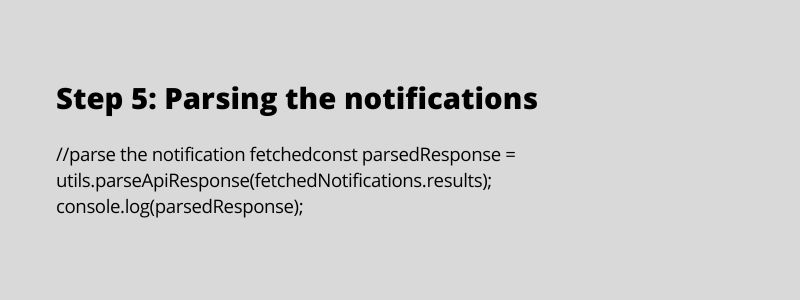
The next step is for parsing the notification i.e the data which we just fetched needs to be converted into a readable format.
Powered by EPNS